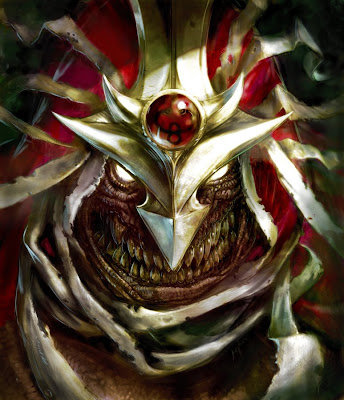
Ok so I finally got around to colouring this pretty little face. Interested in how I did it? Read below X)
To begin I took the greyscale into photoshop and adjusted the colour with HueSaturation until I found a colour that agreed with me. In this case it was a very dark yellow/brown colour. I also adjusted the 'levels' to tone down the blacks and whites a bit. Why do this? It will allow you to reserve the harsh lights and darks to really punch out specific places eg.wet areas like the eyes and lips etc. If you have absolute black and white spread throughout the image you will lose the effect of contrast imo-which is a great tool for leading the eye to a focal point that you want the viewers eye to land on.
After this stage I usually add a multiply layer and start blockin in the basic colours. Purple/blue for the skin, red for the hood/jewel, some type of yellowish brown for the bandages/metals and a contrasting dark green for the bg. These are just to get things going and will usually get altered as I go along. At this point I am a little scatter brained and not really sure how the image will turn out. I have some vague idea somewhere hidden deep within my subconscious and continue to search for something that triggers my muse to get on the right track. When this finally happens I get into this excited type of 'zone' and dig deep into little details like the crevaces of the teeth and eyelids! I usually end up spending a lot of time in these areas-not sure why.
At some point I will flatten all the layers, select all...copy...then undo the flattening, and paste the flattened layer on top of the WIP layers. I group the WIPs together into a WIP folder and hide it-focusing on the new flat layer. I will play around with 'level's and hue saturation and start painting again. I also flip the image horizontal at this point to reveal and obvious mistakes that I've grown accustomed to. After adjusting all this I tend to make another 'normal' layer and add reflective lighting-in this case the left side with a light blue and the right side with a bright green. I keep these on a separate layer because I can just let loose and over do it with no worries of ruining all my hard work. After I've completely covered the image in cheeseball reflective blue&green I go to my layers and rifle through the options-Opacity and screen are usually first. If this doesn't satisfy me on its own I will go in with the eraser and delete a lot of it.
I flatten all of this and then add any cast shadows and punch out the wet highlights I mentioned earlier. In this case the eyes/surrounding areas and the teeth/gums/lips got the wet treatment. The metals and the jewel received some attention as well.
The final stage came with some darkening around the edges of the image to centralize focus and some additional splashes of green in some areas just because I felt like it.
I hope this was a little insightful to my process-I have a video capture of the beginning stage of the colouring -but it's such a huge file that I will not upload it. If anyone has tips on screen capturing on a Mac feel free to enlighten me!
thanks for lookin'
joe


7 comments:
those TEETH!
Marco Nelor: hahaha ya he needs a good brushing...flossing...rinsing and maybe a few hours at the dentist lol
thanks for the comment buddy-your art is awesome
I see you have a new post-off to check it out
Thanks for sharing the process, cool finish!!!
Moyse: thanks Moyse-check out www.joevriens.blogspot.com - I don't update here anymore(for now)
Joverine! great work man, I really enjoyed your coloring process. Well done honestly!
Luca: haha thanks! I've pretty much abandoned this blog-it's surprising that I get a comment here once in awhile :D
cheers!
not only am i an everliving fan of mum-rah (please forgive pun), but i like your arts.
Post a Comment